
Are you looking to boost the read/write speeds on your Truenas server with a dedicated network interface card (NIC)? If so, be careful when choosing a NIC, as Realtek-based cards are not directly compatible with Truenas CORE. However, there is a simple solution to this problem. In this article, we’ll guide you through the steps to enable your Realtek-based NIC to work seamlessly with Truenas CORE.
However, if you are looking for an Intel-based Network card you can just plug in and be done with it. I’ll leave an Amazon link to a cheap 1gb Intel NIC here.
The Problem with Realtek NIC’s
Realtek NICs require drivers that aren’t included in Truenas CORE. Many people mistakenly purchase a Realtek NIC, only to find it’s not recognized by Truenas. Fortunately, the solution is straightforward.
This is the Realtek network card I’ll be working with:

2.5GBase-T PCIe Network Adapter
Suitable for multiple market segments and emerging applications, such as desktops, workstations, servers, communications platforms, and embedded applications.
However, the following steps will work with any Realtek-based network interface card and will enable the card to be seen, communicate and work with Truenas CORE.
Step-by-Step Guide to Enabling a Realtek NIC with Truenas CORE
1. Navigate Truenas Dashboard and Find ‘Tunables’
On the left-hand side of your Truenas dashboard, click on the ‘System’ dropdown and find ‘Tunables’.
2. Add Two Entries into your Tunables Library
On the Tunables screen, click on ‘Add’ in the top right-hand corner and add the two following entries:
- Variable – if_re_load
- Value – YES
- Type – LOADER
Make sure ‘enabled’ is checked and click SAVE.

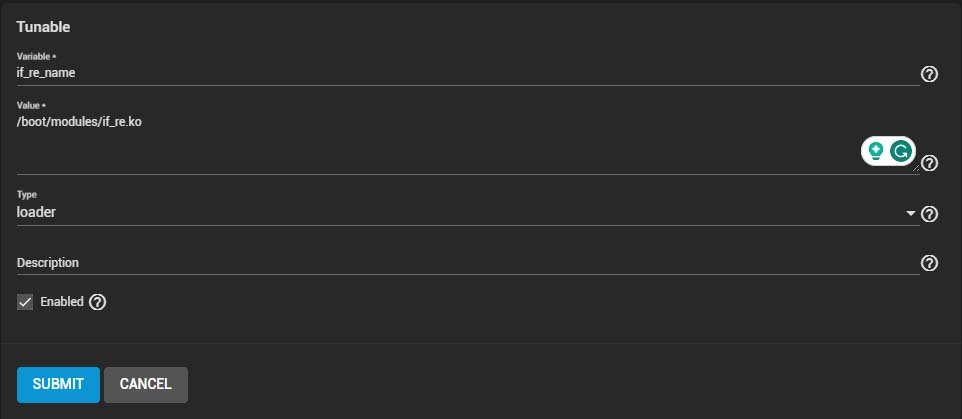
- Variable – if_re_name
- Value – /boot/modules/if_re.ko
- Type – LOADER
Make sure ‘enabled’ is checked and click SAVE.
3. Install the Realtek NIC
Power off your Truenas system and install the Realtek NIC in a PCIe slot on your motherboard. Then, power on your system.
4. Configure the Realtek NIC in TrueNas CORE
Navigate to your Truenas CORE dashboard, and the Realtek NIC should now show up in the interfaces section. Configure the new interface with the settings you would like to use (ex. static IP, description, etc.).
Wrapping up
Setting up a dedicated NIC is a common solution to improve read/write speeds on your Truenas server. However, if you accidentally purchase a Realtek NIC, don’t worry, as there is a simple solution to make it work with Truenas CORE.
By following the steps outlined in this article, you can enable your Realtek-based network interface card to work seamlessly with Truenas CORE. While many recommend an Intel-based NIC, this solution works perfectly fine. With the right configuration, you’ll also be able to enjoy faster read/write speeds on your Truenas CORE system.
People are able to keep their Plex server up to date with the latest TV shows and movies downloaded and ready to stream, but how? You can get started by check out our guide on how to easily run Transmission through an OpenVPN jail on TrueNas using NordVPN. This is the first step in setting up automatic searching, sorting and downloading of media or torrents.