Whether you’re looking for a Transmission VPN setup with TrueNas Core or wanting to run everything in a jail through a stable VPN connection the steps should be generally the same. However, today we’ll walk through how to integrate NordVPN in TrueNas Core to only run Transmission torrent download client in a jail through a VPN to keep our activity secured from our ISP’s. So let’s get started.
Create a New TrueNas Core Jail
Open the TrueNas Core Dashboard and navigate to ‘Jails>Add>Advanced Jail Creation’.
Enter a name for your jail. Leave ‘Jail Type’ as Default. For ‘Release Version’ use either the latest or one version back. (Whatever is the most stable version.)
📌 For the following network settings I will be sharing what I use but this will depend on your network setup.
Check the boxes for ‘VNET’ and ‘Berkeley Packet Filter’.
| ‘vnet_default_interface’ | Leave auto or select your network interface if you have a specified one you’d like to use. |
| IPv4 Interface | Vnet0 |
| IPv4 Address | Enter what you would like to use as the local static IP address for your Transmission install. |
| IPv4 Netmask | More than likely for a personal installation you’ll be using the same as me ‘/24’. |
Check ‘Auto-start’ to have this jail start automatically when your TrueNas Server reboots.
Skip to ‘Custom Properties’ and check the box for ‘allow_tun’. We’ll need this for OpenVPN to work properly. Now Save.
Install the Needed Tools & Dependencies
Click on the Jail and click ‘Start’ if not already started. Once the jail has started click on ‘Shell’.
In the command line type the following commands.
pkgHit enter
This will install a package manager which will be needed shortly. You will be prompted to confirm installation with ‘y’ and then hit enter.
Once it finishes it’s time to install a few of the programs we will need to get everything set up.
pkg install nano wgetInstall OpenVPN / NordVPN & Configure
Now we will start with the installation and setup of OpenVPN which we use as the middleman between our preferred VPN’s configuration.
pkg install openvpnThis will take a few minutes to download and install, but then we can start with the setup of OpenVPN.
TrueNas Core Jail VPN Configuration | NordVPN
Since I like NordVPN that’s what I’ll be using in the following example, however, most VPN services should be just about the same method. So I’ll start a search on Google for something like ‘OpenVPN NordVPN Linux downloads’ so I can find where to download the configuration files I’ll need for my VPN.
After finding that, we need to create a few things including our login information for our VPN service in a format that our jail can understand. So let’s first create a directory in the jail for OpenVPN.
mkdir /usr/local/etc/openvpnIt’s time to create a file that will house our VPN login information.
nano /usr/local/etc/openvpn/pass.txtNordVPN doesn’t like you using your account login for this type of installation. So let’s create a manual login by going to the NordVPN website and logging in. Under services click NordVPN and scroll down to manual setup.
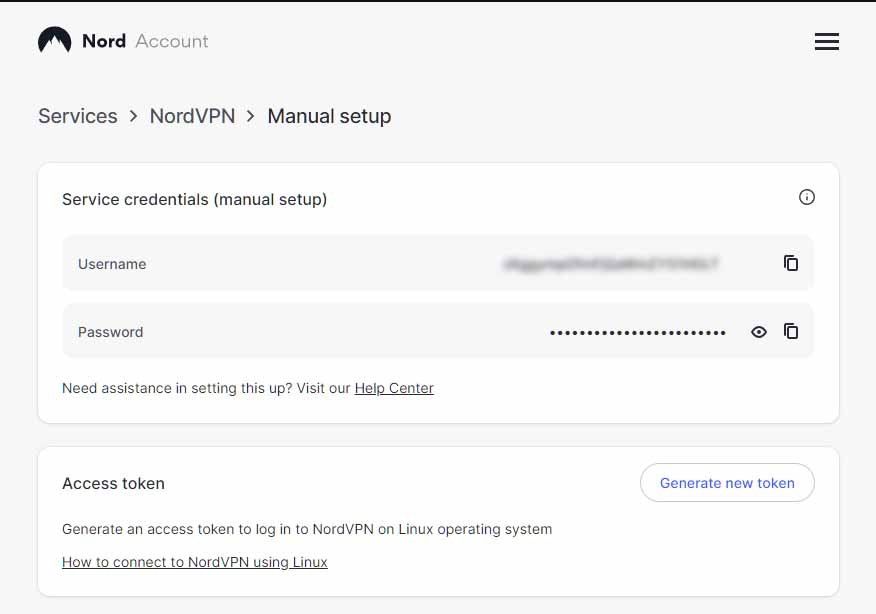
We will use the service credentials (manual setup) for these credentials. You can copy and paste this information by clicking the copy icon on the NordVPN website go over to our shell and use ‘shift + insert’ to paste.
The top line is our email or username and the bottom line is our password. Then Ctrl+s to save, Ctrl+x to exit.
📌 For shells in Truenas the normal Ctrl+c/Ctrl+v copy & paste commands don’t work because that hotkeys are used for other commands. Instead we can use ‘Ctrl+Insert’ to copy and ‘Shift+Insert’ to paste.
Now we need to secure that file so only the owner can read, and write but not execute with it.
chmod 0600 /usr/local/etc/openvpn/pass.txtWe need to create a temporary directory to download all the VPN information.
mkdir /usr/local/etc/openvpn/downloadNavigate to that newly created directory
cd /usr/local/etc/openvpn/downloadRemember those setup files we searched Google for? It’s time to use that archive link we found. This will be different depending on the VPN you’re using and where you live.
wget https://downloads.nordcdn.com/configs/archives/servers/ovpn.zipunzip ovpn.zipI need to choose a server that is good in my area. Luckily, NordVPN has a server finder tool to show the best servers for me. Using: They say the best server for me to use is ‘US9943.nordvpn.com’. So I will look for that name in the files I just downloaded.
lsThis will list files in the directory you’re currently in. I’ll be using UDP so I’ll enter that folder.
cd ovpn_udplsScroll and look for the name of the server NordVPN recommended and copy that file to the correct directory.
touch /usr/local/etc/openvpn/openvpn.confChange ‘us9943.nordvpn.com.udp.ovpn’ with your recommended location.
cp us9943.nordvpn.com.udp.ovpn /usr/local/etc/openvpn/openvpn.confFinish the OpenVPN Configuration
Now we need to let our VPN be able to automatically log in when the jail starts. Edit the config file we just copied using:
nano /usr/local/etc/openvpn/openvpn.confAdd the following to the bottom of this file.
#Automatic login (NORDVPN Credentials)

auth-user-pass /usr/local/etc/openvpn/pass.txt

auth-nocache
Control+S, Control+X to save and exit. Next, we set OpenVPN to start automatically by using the following commands:
sysrc openvpn_enable="YES"sysrc openvpn_if="tun"Test Our OpenVPN Setup
Let do a quick check and make sure we’ve done everything right so far. Check your Public IP.
curl ifconfig.meTake note of the IP address that shows at the start the command line. Now start your VPN.
service openvpn startWith OpenVPN start you can reenter this command and ensure that it differs from the first one.
curl ifconfig.meIf everything is correct so far we can move onto creating our kill switch.
Set the OpenVPN Firewall Rules (IPFW Kill Switch)
Next, we will create a list of ipfw rules that will ensure Transmission will only download or seed if connected through a VPN. This is important for our privacy.
ifconfigUsing that command, under ‘epair’, look for ‘inet’. Keep that IP address in handy as we will need it in a following step.
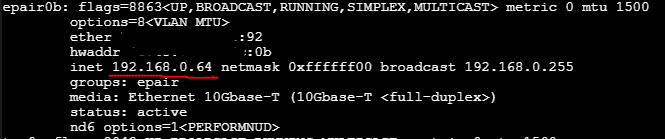
We will also need to know what port your VPN will be using. You can find this out by reading through the file we created using ‘nano /usr/local/etc/openvpn/openvpn.conf’ and looking for this number.

Now we need to create the file that will contain our firewall rules.
nano /usr/local/etc/openvpn/ipfw.rulesWe will enter the following replacing replacing 192.168.1.0/24 with your LAN network and subnet from the last step. We may also need to replace ‘dst-port 1194 keep-state’ with the correct port your VPN uses.
#!/bin/sh
##
# OpenVPN Kill Switch Configuration.
#
# From:
# https://github.com/danjacques/freenasdocs
##

. /etc/network.subr

RULE_NO=1000
fwcmd="/sbin/ipfw"
add_fw() {
  ${fwcmd} add ${RULE_NO} $*
  RULE_NO=$((${RULE_NO}+1))
}

# Flush all current rules before we start.
${fwcmd} -f flush

# Enable loopback.
add_fw allow ip from any to any via lo0

# Enable VPN traffic.
add_fw allow ip from any to any via tun*

# Internal Routing
#
# Change these addresses accordingly for your internal network and netmask.
add_fw allow log ip from any to 192.168.1.0/24 keep-state

# Allow DNS traffic.
#
# OpenVPN configs may use host names, and we'll need to look these up.
# Default route.
add_fw allow log udp from any to any dst-port 53 keep-state

# Allow traffic on OpenVPN UDP port.
#
# If you're using TCP VPN and/or a different port, update accordingly. Consult
# your OpenVPN config for details.
add_fw allow log udp from any to any dst-port 1194 keep-state

# Cleanup rules.
RULE_NO=4000
add_fw allow ip from 127.0.0.1 to any

# VPN Network Access.
RULE_NO=5000
add_fw allow ip from 10.0.0.0/7 to any
add_fw allow ip from any to 10.0.0.0/7

# Block everything else.
RULE_NO=65534
add_fw deny log ip from any to any
Control+S to save, Control+X to exit.
Now we will configure ‘rc.conf’ with our startup IPFW rules.
nano /etc/rc.confAdd the following to the bottom of this file.
# Enable Firewall.
firewall_enable="YES"
firewall_script="/usr/local/etc/openvpn/ipfw.rules"
Save and start the firewall.
service ipfw startVerify it starts without any errors and reports ‘Firewall rules loaded‘. Then verify the rules themselves:
ipfw list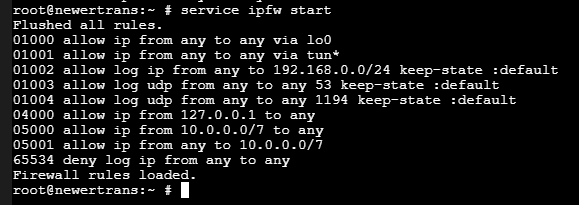
This installation should now be configured to only allow Transmission to connect directly through OpenVPN and should stop all downloads if the connection to OpenVPN is interrupted. Since we had OpenVPN running in the past steps we can now test that this configuration is working.
curl ifconfig.meThat should prove that it’s connected by showing your public IP from your VPN in front of the command line. Now shut off OpenVPN.
/usr/local/etc/rc.d/openvpn stopRunning that command again should return a failed to connect error. Let’s go ahead and start OpenVPN again and move onto the next step.
/usr/local/etc/rc.d/openvpn startInstall and Setup Transmission in the Same Jail
It’s finally time to start our installation of Transmission.
pkg install transmissionStop the jail and create mounting points for Transmission.

This image should be showing mounting the default download transmission has after initial download for easier setup at – /mnt/First/iocage/jails/newertrans/root/usr/local/etc/transmission/home/Downloads
Here I’m giving this jail the ability to access and save files in a downloads folder outside of this jail. This will be for later when we want Sonarr or Radarr to pick up certain downloads and move them to their series folder elsewhere. Make sure that ‘Read-only’ is unchecked and click save.
In accounts in the sidebar under groups, create a new group with the ‘gid’ of 921.
Next, we will create a user for transmission using the following perimeters.
| Full Name | transmission |
| User | something |
Then we need to give the Transmission group access to this location.
- Navigate to Storage > Pools
- Find the location where the downloads folder we just set up for Transmission is. Click the 3 dots then ‘Edit Permissions’.
- Scroll to the bottom and click ‘Add a New ACL Item’.
| Who | Group | Torrent_Group |
| ACL Type | Allow | |
| Permissions Type | Basic | |
| Permissions | Full Control | |
| Flags Type | Basic | |
| Flags | Inherit |
- Check the box for ‘Apply New Permissions Recursively’ and hit ‘Save’.
Configuring Transmission
Navigate to jails and start it back up.
sysrc transmission_enable="YES"
sysrc transmission_user="root"
sysrc transmission_group="wheel"
The next two commands are to start and stop Transmission so it will create the config files.
service transmission start
service transmission stop
You may have to wait a few seconds before you can use the stop command because it will make you wait for transmission to fully start up before you can stop it, but once we’ve done that, we can edit those configuration files.
nano /config/transmission-home/settings.jsonLook for the line with “rpc-whitelist”: “127.0.0.1::1,” We change this to the local IP addresses you would want to have access to Transmission’s admin portal. In my case, I decided to let all local users to have access. So, I changed mine to “rpc-whitelist”: “127.0.0.1:1,192.168.0.*”,
Control+S to save, Control+X to exit.
It’s finally time that we can test our work thus far. Start Transmission.
service transmission startTesting our Configuration
Go ahead and start a torrent download of your choice through the web interface of Transmission. While it is downloading stop the OpenVPN instance in your transmission jail by using the following in the shell.
service openvpn stopDoing this you should see the download rate of the torrent drop to zero. This is because the kill switch we set up won’t allow Transmission to connect without going through the VPN. We can start OpenVPN back up by using:
service openvpn startDisplay Public IP at Shell Login
Open the shell for transmission jail once again. We are going to set a script to display our public IP address every time we open our shell. We will create a new file using:
nano /etc/ipcheck.shWrite the following in this file.
#!/bin/bash

printf "\\33[0;34mYour public IP address is:\033[0;31m\n"

wget -qO - http://wtfismyip.com/text

printf "\\033[0m"
Control+S to save, Control+X to exit. Now give permissions to this new file.
chmod +x /etc/ipcheck.shNext, we will edit the login file to display when opening the shell.
nano ~/.loginAdd the following to the bottom.
#Display Public IP at Shell Open Script
/bin/sh /etc/ipcheck.sh
Control+S to save, Control+X to exit. Now exit and restart the jail.
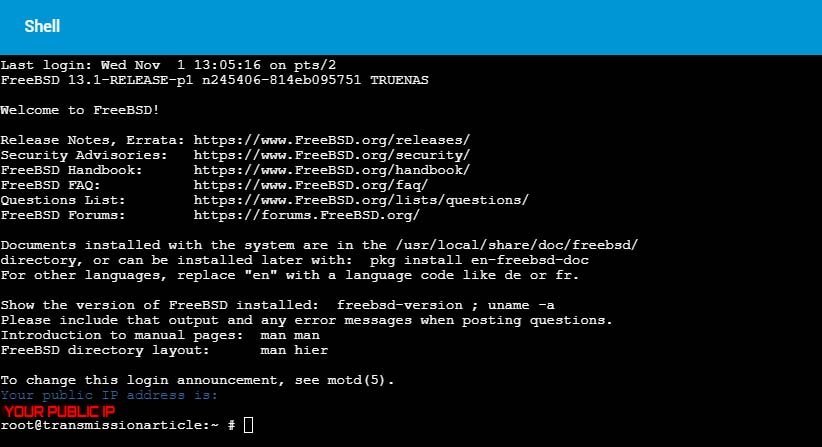
To confirm the script is working properly, when you open this jail’s shell it should now look something like this.
Conclusion
Now we finally have secure torrent downloads all setup with NordVPN and we can happily download torrents using Transmission in this jail without worrying about our privacy being compromised by our shady ISP companies.
For further peace of mind, you might also want to check out and use the torrent IP checker from TorGuard. This is a torrent download that remains active as long as it’s in your queue and will constantly monitor the IP address your torrent client is downloading with. Very useful to keep your mind at ease.
Did you know that we can finally use that old Realtek NIC we have laying around to speed up our transfer speeds on older computers running TrueNas? It’s not drag ‘n drop like an Intel NIC is but it’s still possible to repurpose something that’s probably just collecting dust. Check out our guide on using a Realtek NIC with TrueNas Core for faster read/write speeds!


